Sunday, September 22, 2013

Cauliflower Pizza Crust (For The Pintester Movement!)


Rachel and I are so excited to be apart of the Pintester Movement.
So as I said in the last post we are going to try to only do healthy recipes from now on to help aid me in my quest to become a healthier (and hopefully smaller) me!
This week we made Cauliflower Crust Pizza, since pizza is one thing I crave since starting my new diet.
I found this recipe a while ago on Pinterest and have been anxious to try it!
In the original post the blogger said to use Italian seasoning and Fennel seeds, we had neither so we didn't completely follow the recipe 100% >_< But here is what we used!
Ingredients:
1 recipe of Cauli-Rice
( the recipe: cauli-rice)
1/3 c shredded mozzarella cheese 
(we used half fat free and half regular)
1 egg
1/4 tsp salt
1/8 tsp black pepper
We doubled the recipe so my family could try it too.

This is how you make the Cauli-rice. 
We start by braking the cauliflower (you use an entire head for one crust) down into manageable chunks.


Next we use my salad shooter, we just shredded up the cauliflower as much as we could. 
(Recipe called for a food processor but I don't have one) 


Next with our cauliflower in a large microwavable bowl we covered it with microwavable saran wrap.
Poked some holes in the top to let it vent as it steams and microwave for 7 minutes.
~~~~~~~~~~~


When it's done we were supposed to wait a few minutes for it to cool a bit, and put the cauli-rice on a cheese cloth, and squeeze the crap out of it! It needs to be super dry.
I did not wait for it to cool nor did I have a cheesecloth... 
I burned my hands squeezing the liquid out using a thin kitchen towel.


There was a big size reduction.


Then we added our cheese, egg, salt n' pepper!
 We used a metal spoon to mix it together.


Shaping the "dough" was a bit of a challenge.
We just took a ball of the cauliflower mixture and smashed it down til it was flat and then used my hands to form it into a round shape.
We used a silmat as she suggested (I love this thing! Nothing sticks to it!) 


Place it into your preheated 450 degree oven for 15-20 mins (we did 20)

Since we doubled the recipe we were able to make 2 pizza crusts.

(We transferred this crust onto a regular pan so we could start the next crust thinking since it was cooked it wouldn't stick... We were wrong, don't do it!)

(Made this one into a rectangle, not for any particular reason... just wanted to.)

The first pizza we made into a buffalo chicken pizza. 
Using precooked chicken breast, fat free ranch, cheese (1/2 fat free 1/2 regular) and buffalo sauce. 
And thanks to my lovely friend, there was waaaay too much ranch on it because she doesn't really like spicy food and wanted it cooled down.

(Not the healthiest pizza but it's reduced fat and low carb!)
For the last step you place the pizza on the top rack on broil until the cheese is bubbly.

and here is the result!


Rectangle pizza we did a regular spinach pizza.


Our buffalo pizza was a little messy and Rachel was not able to finish her slice because it was too spicy for her. But I personally loved it (I have obsession with not only garlic but spicy things too!) The crust held up nicely and was chewy. It was a huge relief to have pizza in my tummy ^_^ 
Rachel's only complaint was that the crust was too think in some areas, she wanted a crispier crust, and she could taste the cauliflower.
The taste may have been because we didn't use the seasonings like in the original.
We loved it and would make it again any day of the week! The process to make it is very long, but worth it.
~Megan


And for your enjoyment a little Thorin sleeping on the Husband's keyboard =^.^=


Monday, September 9, 2013

Carrot Fries!

So recently I have changed my diet because I am trying to get healthier. 
I no longer eat white bread, pasta, or rice, cut sugar out almost completely, gave up all soda including diet, and trying to limit processed food.
In taking on this new lifestyle of mine our posts will be changing a bit.
We will be making healthy (or healthier) food for our blog.
I would just like to thank my friend Rachel and husband David for their support in this.
Well as our first healthy post we made Carrot Fries!!!
Here is what you will need:
3-4 carrots
Parmesan cheese
garlic (minced)
salt and pepper
olive oil


To start off you need to cut your carrots into "fries" like you would potatoes.
Put them into a large bowl


Next drizzle some olive oil over them. About 2 tablespoons should be enough.
Add salt and pepper (to taste)


Mix it up good!


Next add your garlic (to taste) and Parmesan cheese (to taste)

 We like cheese a bit too much >_<

Spread them on a baking sheet. 
Bake at 450 for about 20 mins or until they are crispy enough to your liking.


Done! And they are yummy! 


We couldn't get them crispy enough to our liking. So we played with how we cut them.
We found that using a potato peeler we could get them super crispy when they baked.

Nice little snack for me ^_^

Thank you for reading!
~Megan

Oh, here is a frustrated kitty that can't fit himself into his box!
=^.^=

Thursday, September 5, 2013

Cupcake Serving Tower!

I know we normally make post about food, but this is food related! 
My friend asked me to make a birthday cake for her very adorable 2 year old daughter.
She wanted a jungle theme cake with 24 cupcakes and a small cake to go with it.

This was the cake she found on a Facebook page that she wanted me to make for her. It is very cute, I knew I could duplicate it but I didn't want to go out and buy a cupcake tower...


So I decided to make a cupcake tower!
Here is what you will need:
2 empty veggie cans
1 empty tuna can
cardboard cake rounds 2 of each size.
(I used 12 in, 10 in, and 8 in)
Hot glue
Ribbon (1 in thick)
pattern paper
and scissors


I started off by gluing the cardboard rounds together (not the white slick part but the actual cardboard side)


Should look like this. And you do this with all the sizes!


Here are all my board glued together.


Next cut the pattern paper to fit around the can. 


Wrap it around and glue to can


Do this with all three cans.


Glue the smallest shortest can to the bottom of the largest cardboard circle, directly in the center.


This will be the base of the entire structure so you want it to be centered.


now for the next level I had trouble gluing the cans to the boards because the glue didn't have anything to hold onto. So I cut out circles from another cardboard round and glued it to both the top and bottom of the cans. 


The open side still had a lip I could glue the cardboard to and make it stay.  Do this to both cans, I didn't have a problem with the tuna can staying on the bottom so I didn't do anything to it.


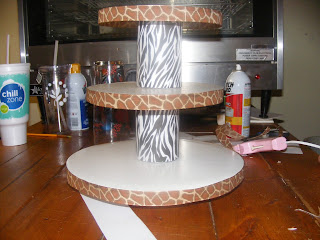
This is the base and middle layer. Next you add the last can to the top of the middle directly centered and glue the top on. 


Once you have your stand together you add the last touch! Decorative ribbon to hide the unsightly cardboard sides. Put a dab of glue on the cardboard and hold the ribbon to it, move over an inch add a dab and hold. Do this until the ribbon covers the outside.


Word of warning you may burn your fingers holding the ribbon on the glue (if you did it like me and used your fingers to press the ribbon to the hot hot glue XD)


Here is the finished product! Very Zoo like I think ^_^


And the stand holding the cake and cupcakes!


It turned out wonderful and her daughter loved it!

Here are some kitties =^.^=


My boys, aren't they cute?

Thanks for reading! 
~Megan