Wednesday, August 21, 2013

Fail Cheesecake...

Alright I had a craving for Cheesecake... but not just any cheesecake... the one with the chocolate swirls!
I wanted it so bad, but I was not willing to fork out $15 for one at Publix.
So Rachel and I decided to try to make it at home! Why not make a blog post about it, what could go wrong?
Well I don't have a recipe of my own so I searched the interwebs for a simple recipe. I found this one http://www.dianasdesserts.com/index.cfm/fuseaction/recipes.recipeListing/filter/dianas/recipeID/3192/Recipe.cfm
It seemed easy enough, I decided not to do the crust because some of the best cheesecakes I have had didn't have the crust.
Ingredients:
2 packages room temp cream cheese (16 oz in all)
1 c powdered sugar
juice from half a lemon
zest from half a lemon
2 tsp vanilla extract
4 eggs separated
1/2 heavy cream


Now we may have gone wrong with the crust but it could have also been the fact that we used whole milk and not heavy cream. In fact I am 100 % sure that is where we went wrong. Anyways, you start off by beating the cream cheese for about a minute 


Then you add the yolks one at a time and beat in the cream until the mixture is smooth. Then  mix in the sugar lemon juice, zest, and vanilla extract. Mixture should be very fluffy and no clumps.


Next using an electric mixer mix the egg whites until white and form soft peaks.


Fold the egg white fluff into the cream cheese mixture.
Prepare a pan using Crisco or a non-stick baking spray.


Pour 3/4 of the mixture into the baking dish.


The remaining 1/4 keep in the mixing bowl and add about 4 tbsp of cocoa powder and mix.


Once it's mixed well, marble into the white cheese cake.


Once it is well marbled place into the oven at 350 for 40 mins.


When it is baked it will look like this!


Refrigerate over night or put in the freezer for about 2 hours if you are impatient like us.


While it actually tasted pretty good the texture was way off and that was my big problem with it.
Rachel's problem with it was the texture as well. We love the thick and yet fluffy creaminess of cheesecake and this was almost grainy. It just wasn't right. So we think it was the fact we used whole milk instead of cream. Try it and let us know if yours turns out better!

Here is a herd of kitties!
You're Welcome!


~Megan

Saturday, August 17, 2013

Banana Bread

While typing in the post name in my head I could not help but hear Gwen Stefani spelling it for me XD
Anyways, this weeks yummy was made by request of my husband 
and much protest of my co-blogger Rachel.
She really doesn't like bananas. And I can relate, I have a texture problem with them. I however really love the taste, and as long as they are mashed up and mixed with other things I like it.
Moving along though, here are the list of ingredients you will need:
3-4 over ripe Bananas
1/3 cup melted butter
1 cup sugar
1 egg
1 teaspoon vanilla
1 teaspoon baking soda
Pinch of salt
1 1/5 cups of flour
You can add:
1/2 cup chopped nuts
or
1/2 cup chocolate chips
It is up to you! We like it plain :-)

First you mash your banana which you can use a spoon to do.

(I still have my kool-aid spoon from the 90s)

Next you will add the sugar, butter, egg, and vanilla.


Then you add the salt and baking soda.

(I was super excited because I got to use my "pinch" measuring spoon!)

Mix in the flour last adding a little at a time to make sure it is well incorporated.


Now you grease your bread pan. I used Crisco and spread it using a paper towel all over the inside of the pan. Then put a small amount of flour and pat the pan to spread it until it's covering the Crisco.


Add the dough to you pan and place it in a preheated 350 degree oven!


It takes 1 hour to bake completely.


And your Yummy is done!

Banana bread doesn't last long in my house! My husband loves it, and my Grandma would have it for breakfast every morning if she could! 
Sorry Rachel, I know how much you didn't like this week's post but we'll do something you like next week! 
;-)


Saturday, August 10, 2013

Rainbow Bread!!!

Megan here, and we have been so excited to try our hand at making Rainbow Bread. 
Our bread recipe is very simple and if you have an electric mixer with a bread hook it's super easy!
For the bread you will need:
3/4 c warm water 
1 package active yeast
1 tsp salt
1 1/2 tbsp sugar
1 tbsp butter 
1/2 c milk
3 c all-purpose flour
(and a bit more for surface kneading)
and of course gel food coloring 
(purple, blue, green, yellow, orange, and red)


 You start out by mixing warm water with your yeast.


Once your yeast had dissolved you will add the butter (melted), salt, sugar, and milk.
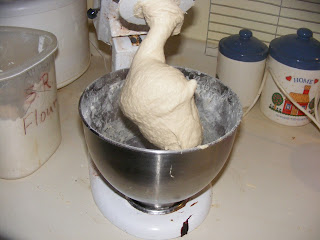
next add 2 cups of flour and attach to your mixer using the bread hook attachment.

**If you don't have an electric mixer add one cup of flour and mix with your whisk. When you add the second cup you can no longer use the whisk so you can either use your hands (with butter or flour on them) or a wooden spoon. Slowing add in the 3rd cup kneading it into the dough** 


When adding in the 3rd cup of flour do it slowly so it will be better incorporated into the dough.


I know not very sanitary... but hey it's my house, my cat, and nobody had a problem with it. 
Plus if I didn't just let him stay on my shoulder he would have been climbing up my back all night, we wouldn't have gotten anything done! 
In fact as I am doing this post he is just lounging on my shoulder. :/


You may not need the entire 3rd cup of flour, then again you may need more. It all depends on your area and the humidity outside. Being Florida girls baking in the rainy season we needed a lot more flour. You will know the dough is done when it no longer sticks to the sides of the bowl. **or counter if you are kneading by hand**

Next you will take the dough out of the bowl and knead by hand into a ball shape and flatten it out.


Cut the dough into thirds and then cut the thirds in half. This will give you 6 dough balls!

The next part is the most fun (and messiest)! Adding in the food coloring was actually harder than I thought it would be. Also be warned! This can stain your counter-top!
When kneading the food coloring into the dough you make a little hole in the middle and add about a teaspoon of the food coloring in. Fold in it and on a floured surface start to knead it until the color is fully incorporated. To prevent the colors from mixing make sure to clean your area after each ball is done.


 There we are kneading away!


And here is the mess we left behind!

After all the dough is colored you will need to put each ball into it's own buttered bowl (flip the dough so it is greased all over), with a moist towel over it, and left in a warm place to rise for 1 hour. 

Now that an hour each ball of dough should have doubled in size. Punch it down and knead it again (use more flour if you need to).

Next you will get out your loaf pan, you need to make sure to flatten out the dough into the shape of the pan you will be baking it in. 


To minimize the bubbles in the bread wipe a bit of water onto each layer as you go so it sticks together better.

Butter your pan and carefully put the dough in.
Preheat your oven to 375


Cover with a moist cloth and let rise again for about 30 mins.
Put in the oven and bake for 45 mins!

After bake time it up take it out of the oven! You know the bread is done when you can tap the top and it sounds hollow. Butter the top of the loaf so it softens the hard crust.


Looks yummy doesn't it?

We gave it about 15 minutes to cool down 
(normally you should wait 30 mins but we couldn't contain ourselves!)
Slice it up!

*Helpful tip: slice the bread upside down. It's softer on the bottom so you won't smush it*


There you have it! Beautiful rainbow bread! Now you can turn your boring white bread into a Fabulous Rainbow!

And also have PB&J sandwiches!